Table of Contents
NEJE Rotating Shaft Installation Guidelines:
Note: if you make an error in setting the operating parameters during the following operation process, don't worry. You can use NEJE software to refresh the firmware and restore to the original parameter mode. For safety reasons, it is recommended that you operate without installing the laser and start the laser after setting it up.
The NEJE rotary shaft is a multifunctional, high-precision, and easy to operate synchronous wheel that is compatible with NEJE series devices. The rotary shaft is equipped with an external drive and is easily compatible with the new NEJE 3 and NEJE 3 Plus 5pin Z-axis expansion interface, NEJE Max4 5pin A-axis expansion interface, and the upcoming NEJE 3Max-V2 5pin A-axis expansion interface through a 5pin compatible interface; At the same time, the rotation axis can be directly connected to the motor, and the Y-axis can be changed to be compatible with older NEJE devices, such as NEJE 2 and NEJE 2s series devices.
Rotary tutorial for NEJE machines
NEJE Max 4,NEJE 3 Max V2 and NEJE 3 Max
Connect with NEJE 3 Max,NEJE 3 Max V2 and NEJE Max 4 5pin Axis expansion interface.
Step1. Directly connect the rotary shaft drive and motherboard 5pin expansion interface through a 5pin signal cable.
Step2. Software(lightburn) Settings.
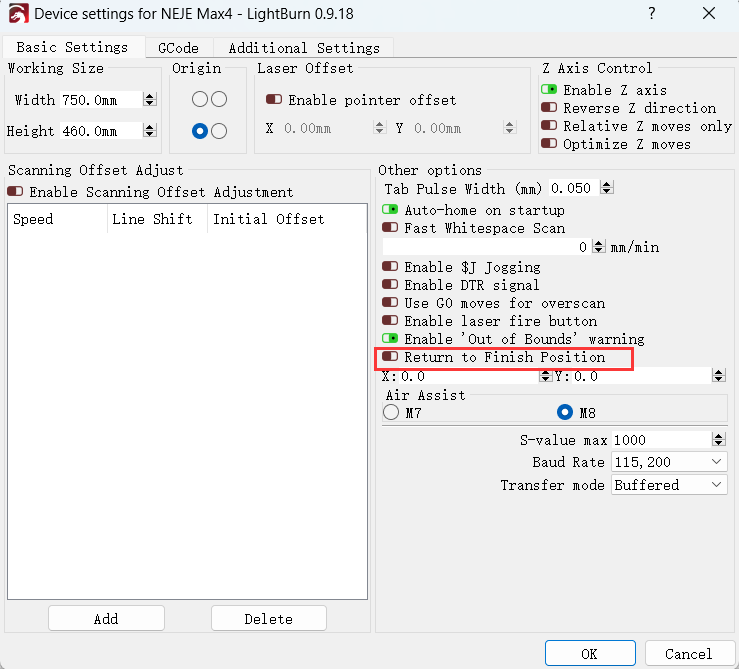
“Edit” - “Device Settings” - “Return to Finish Position” set OFF
NEJE 3 Max,NEJE 3Max-V2 and NEJE Max 4 is the A interface.

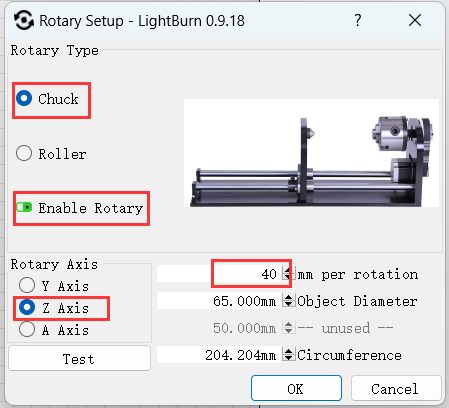
“Tools” - “Rotary Setup”
Rotary Type: “Chuck”
“Enable Rotary” set ON
“Rotary Axis” set “A Axis”
If your object diameter is 100mm,then insert 100.
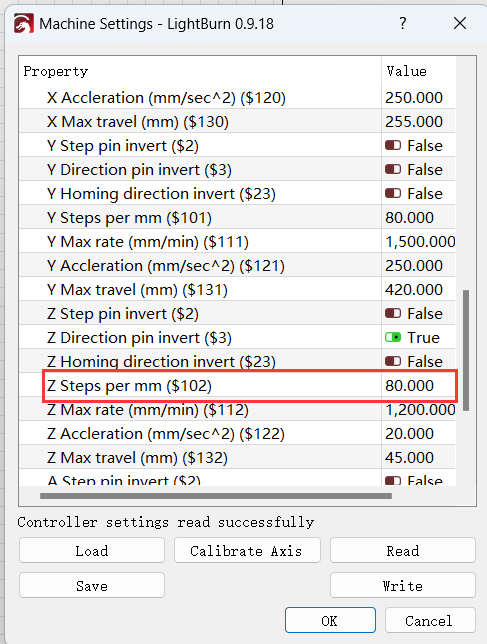
“Edit” - “Machine Settings”
“z steps per mm($102) ” set: 80
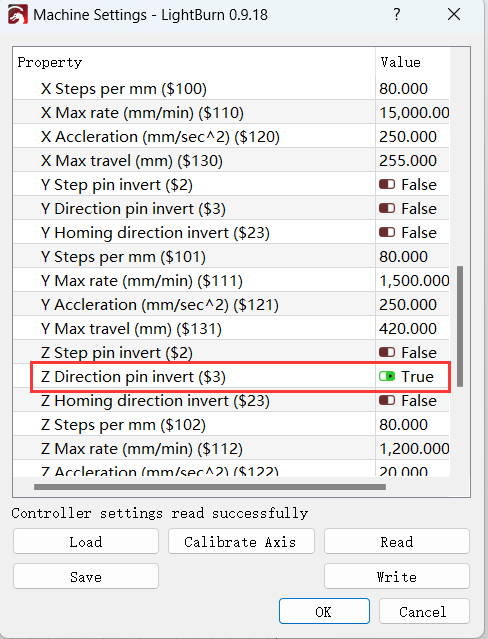
“Z direction invert” set: true
Step3. Place the rotation axis directly below the X-axis after homing the X-axis and Y-axis; You can also position the X and Y areas first, and then activate the rotation axis to place it in any position you want. However, this installation method needs to be repeated after Homing.
Step4. Change the direction of the grabbing wheel, and the NEJE rotating shaft is made of industrial grade standards, with high precision and smooth operation It can be installed on two sides, but when installing in reverse, it is necessary to pay attention to the installation sequence of the claws, and install them in the order marked with “3”, “2”, and “1” The side adjustable roller and concentric cone can be well adapted to different shapes of materials, making it easy to operate; Due to the precision production of the grab plate using metal materials, if your material is coated with paint, it is recommended to use materials such as heat shrink tubing to prevent scratches on the grab plate clamp feet.
NEJE 3 / 5 and NEJE 3 Plus
(You can start watching from the 1 minute mark)
The only difference between [NEJE 3 and NEJE 3 Plus] and [NEJE 3 Max,NEJE 3 Max V2 and NEJE Max 4] is the interface that they connect.
Connect with NEJE 3 and NEJE 3 Plus 5pin Z-axis/Axis expansion interface.
Connect with NEJE 3 Max,NEJE 3 Max V2 and NEJE Max 4 5pin Axis expansion interface.
Step1. Directly connect the rotary shaft drive and motherboard 5pin expansion interface through a 5pin signal cable.
Step2. Software(lightburn) Settings.
“Edit” - “Device Settings” - “Return to Finish Position” set OFF
The method is the same.It should be noted that the 5pin interface defined by NEJE 3 Max,NEJE 3Max-V2 and NEJE Max 4 is the A interface.
“Tools” - “Rotary Setup”
Rotary Type: “Chuck”
“Enable Rotary” set ON
“Rotary Axis” set “Z Axis”
40 mm per rotation
“Edit” - “Machine Settings”
“z steps per mm($102) ” set: 80
“Z direction invert” set: true
Step3. Place the rotation axis directly below the X-axis after homing the X-axis and Y-axis; You can also position the X and Y areas first, and then activate the rotation axis to place it in any position you want. However, this installation method needs to be repeated after Homing.
Step4. Change the direction of the grabbing wheel, and the NEJE rotating shaft is made of industrial grade standards, with high precision and smooth operation It can be installed on two sides, but when installing in reverse, it is necessary to pay attention to the installation sequence of the claws, and install them in the order marked with “3”, “2”, and “1” The side adjustable roller and concentric cone can be well adapted to different shapes of materials, making it easy to operate; Due to the precision production of the grab plate using metal materials, if your material is coated with paint, it is recommended to use materials such as heat shrink tubing to prevent scratches on the grab plate clamp feet.
NEJE 2, NEJE 2s, NEJE 2s Plus, NEJE 2s Pro, NEJE 2s Max
The old device can only use the Y-axis as the rotation axis, and can directly unplug the Y-axis motor interface and plug it into the rotation axis motor for use The difference in setting is roughly the same as the previous guidance, but it should be noted that when setting the rotation axis, the “Y axis” needs to be rotated The 'Machine Setting' requires reducing the Y-axis running acceleration and setting $111 to 1500.